How to Make Curved Text in Microsoft Powerpoint 2010
You may be in a hurry to create your presentation, and take time only to create it with apparently text. To make the presentation more interesting, y'all must make full in groundwork images, colorful text, and decorative art. But these efforts take time to make their combined effect presentable.
However, yous tin can hands liven upward a plain text type presentation by giving your text more curves. PowerPoint allows you to curve your text in many means. You can likewise change your plain text into decorative art text, make the text follow a nice curve or circle, or do all of them simultaneously.
To simplify things, we have created some unproblematic instructions.
3 fundamental text curving techniques in PowerPoint.
- Curve plain text
- Bend WordArt text
- Curve text effectually a circular shape
The reward of learning the in a higher place three methods is all 3 are equally effective. Additionally, you can implement them easily to get the desired result quickly.
Allow u.s.a. start.
Method #ane: Curve plain text
Step #1: Open up a presentation
The text you want to curve must be enclosed in a text box.
Permit us starting time with a bare presentation.
Step #2: Insert a Text Box
Click on the Insert tab in the top menu bar to modify the ribbon.

In the section Text, click on Text Box.

The cursor will change to a cross.
Click and agree the mouse at a bespeak where you want the tiptop left-hand corner of the text box to appear.
Drag the mouse downwardly to the bottom right-mitt corner.
PowerPoint opens a text box with handles on its corners and sides.

Use the handles appropriately to position and size the text box.
Double-click inside the text box and enter some text.

Click outside the text box to exit the text box.
Pace #3: Curve the text
Select the entire text yous have entered.
Click on the Format tab in the top menu bar to change the ribbon.

In the section WordArt Styles, click on Text Effects to open a carte du jour.

Click on Transform to open some other carte du jour.

The bill of fare offers three types of transformations:
- No Transform (get out without creating curved text)
- Follow Path
- Warp
Yous can select any of the to a higher place, and we have selected Arch: Warped, under Warp.

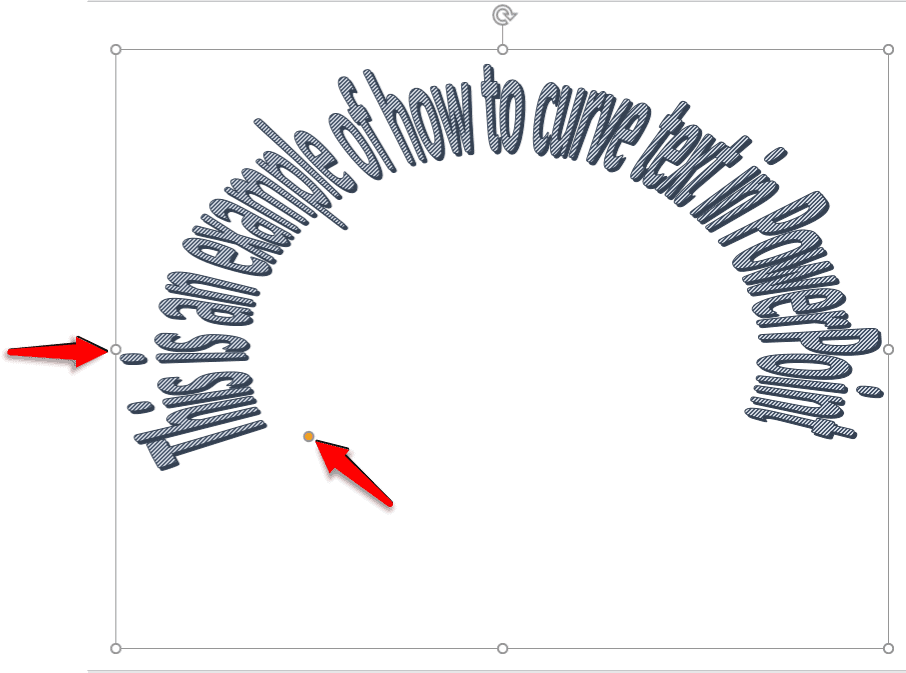
Step #iv: Modify the curved text
Click and drag the white circles to position and size the curved text.

Click and drag the yellow circle to the correct to increment the text height. Drag it to the left to decrease the height.
Click and elevate the yellow circle vertically upwards to decrease the angle between the text.
Click and drag the yellow circle vertically downwards to increase the bending betwixt the text.
One time y'all are satisfied with the results, click exterior the text box.

Method #2: Curve WordArt text
This method is similar to Method #1, you only supercede the obviously text with WordArt.
Step #1: Open up a presentation
Let us start with a blank presentation.
Step #ii: Insert a WordArt
Click on the Insert tab in the top menu bar to change the ribbon.

In the Section Text, click on WordArt.

PowerPoint opens up several choices for WordArt.

Select your WordArt.
PowerPoint opens a text box with handles on its corners and sides and the WordArt as content.

Use the handles appropriately to position and size the text box.
Double-click within the text box and replace the text with your own.

Click outside the text box to exit the text box.
Pace #3: Curve the text
Select the entire text you have entered.
Click on the Format tab in the peak menu bar to change the ribbon.

In the section WordArt Styles, click on Text Effects to open a card.

Click on Transform to open another carte.

The carte offers three types of transformations:
- No Transform (go out without creating curved text)
- Follow Path
- Warp
You tin select whatsoever of the above, and nosotros accept selected Arch: Warped, under Warp.

Step #4: Alter the curved text
Click on the curved text.
Click and elevate the white circles to position and size the curved text.
Click and drag the xanthous circle to the right to increment the text elevation. Drag it to the left to decrease the height.
Click and elevate the yellow circumvolve vertically upwards to decrease the angle between the text.
Click and drag the yellowish circumvolve vertically downwardly to increment the angle betwixt the text.
Once you are satisfied with the results, click outside the text box.

Method #3: Curve text around a circular shape
For this method, you can use either patently text or WordArt.
Step #one: Open a presentation.
We starting time with a blank presentation
Insert a circular shape.

Step #2: Insert WordArt
Follow Method #2, stop later on Step #2.

Pace #3: Curve the text around a circular path
Select the entire text you have entered.
Click on the Format tab in the top menu bar to change the ribbon.

In the section WordArt Styles, click on Text Effects to open up a menu.

Click on Transform to open another bill of fare.
Fig-6
The carte offers 3 types of transformations:
- No Transform (exit without creating curved text)
- Follow Path
- Warp
To completely curve the text around the round shape, select Circle under Follow path.

Pace #4: Modify the curved text
Click on the curved text.

Click and drag the white circles to position and size the curved text.
Click and drag the yellow circle to the correct to increase the text elevation. Drag it to the left to subtract the acme.
Click and drag the yellowish circumvolve clockwise forth the circular shape to decrease the angle between the text.
Click and drag the yellow circle anti-clockwise along the circular shape to increase the angle between the text.
Once you are satisfied with the results, click outside the text box.

Conclusion
With the in a higher place iii methods, you at present know how to bandbox upwardly your patently presentation with curved texts. You tin can use this knowledge to increment the attraction of whatsoever presentation in PowerPoint.
DOWNLOAD HERE
How to Make Curved Text in Microsoft Powerpoint 2010 TUTORIAL
Posted by: derekcative.blogspot.com


Comments
Post a Comment